
| 일 | 월 | 화 | 수 | 목 | 금 | 토 |
|---|---|---|---|---|---|---|
| 1 | 2 | 3 | 4 | 5 | ||
| 6 | 7 | 8 | 9 | 10 | 11 | 12 |
| 13 | 14 | 15 | 16 | 17 | 18 | 19 |
| 20 | 21 | 22 | 23 | 24 | 25 | 26 |
| 27 | 28 | 29 | 30 |
- Repository
- Security
- js
- Singleton
- Kotlin
- javascript
- Stateless
- vuex
- vue-cli
- thymeleaf
- Spring
- VUE
- 의존성 주입
- Excel
- di
- 로그인
- dependency injection
- Java
- DB
- 싱글톤
- cache
- HTTP 메서드
- HTTP
- 프로토타입
- JPA
- 캐시
- 라이프 사이클
- Vue.js
- BEAN
- Setter
- Today
- Total
jhhan의 블로그
스프링 코어(15) - 빈 스코프 : 프로토타입 본문
오랜만에 글을 써봅니다.
이번 포스트에서는 빈 스코프에 대해서 알아보겠습니다.
지금까지는 빈 스코프에 대해서 '싱글톤'으로 한정지어서 계속 진행했습니다.
(스프링 빈이 기본적으로 싱글톤으로 생성됨)
하지만 빈 스코프는 싱글톤만 있지 않습니다.
일단 종류를 알아보겠습니다.
(많이 쓰이는 것들을 알아보겠습니다.)
- 싱글톤 : 기본 스코프, 스프링 컨테이너의 시작부터 종료까지 유지되는 가장 넓은 범위
- 프로토타입 : 빈의 생성, 의존관계 주입, 초기화만 하고 그 이후는 관리하지 않음
- 웹 관련 스코프
- request : 웹 요청이 들어오고 나갈 때까지만 유지되는 스코프
- session : 웹 세션이 생성되고 종료될 때까지 유지되는 스코프
- application : 웹의 서블릿 컨텍스트와 같은 범위로 유지되는 스코프
이렇게 있습니다.
그럼 이번에는 프로토타입부터 먼저 알아보겠습니다.
프로토타입의 빈 요청
- 프로토타입 스코프의 빈을 스프링 컨테이너에 요청
- 스프링 컨테이너는 프로토타입의 빈을 생성
- 빈 생성, 의존관계 주입, 초기화 진행
- 생성된 프로토타입 빈을 클라이언트에게 리턴
- 이후 같은 요청이 오면 다시 새로운 프로토타입의 빈을 생성 & 리턴
1~4는 싱글톤과 같지만, 5번부터 다릅니다.
프로토타입 빈은 그 이후의 관리를 하지 않습니다.
그래서 생성 후 관리는 클라이언트에게 넘어갑니다.
코드로 알아보겠습니다.
싱글톤과 프로토타입 모두 구현해서 비교할 것입니다.
test 폴더 밑에 scope라는 패키지를 생성한 후
SingletonTest.java 파일을 먼저 생성해서 진행합니다.
public class SingletonTest {

    @Test
    void singletonBeanFind() {
        AnnotationConfigApplicationContext ac = new AnnotationConfigApplicationContext(SingletonBean.class);

        SingletonBean singletonBean1 = ac.getBean(SingletonBean.class);
        SingletonBean singletonBean2 = ac.getBean(SingletonBean.class);
        System.out.println("singletonBean1 = " + singletonBean1);
        System.out.println("singletonBean2 = " + singletonBean2);

        Assertions.assertThat(singletonBean1).isSameAs(singletonBean2);

        ac.close();
    }

    @Scope
    static class SingletonBean {
        @PostConstruct
        public void init() {
            System.out.println("SingletonBean.init");
        }

        @PreDestroy
        public void destroy() {
            System.out.println("SingletonBean.destroy");
        }
    }
}
SingletonTest 파일에 적은 후 실행을 합니다.
비교를 위해서 두개의 빈을 생성합니다.

실행결과입니다.
singletonBean1 과 singletonBean2가 같은 것을 알 수 있습니다.
둘이 같기 때문에 Assertions도 isSameAs를 적용했을 때 정상적인 결과가 나오는 것을 알 수 있습니다.
물론 이전 포스트에서 계속 다룬 것이 싱글톤이기 때문에 이런 결과가 나온다는 것은 쉽게 알 수 있을 것입니다.
그러면 다음으로 PrototypeTest.java를 만듭니다.
public class PrototypeTest {

    @Test
    void prototypeBeanFind() {
        AnnotationConfigApplicationContext ac = new AnnotationConfigApplicationContext(PrototypeBean.class);

        System.out.println("Find PrototypeBean1");
        PrototypeBean prototypeBean1 = ac.getBean(PrototypeBean.class);
        System.out.println("Find PrototypeBean2");
        PrototypeBean prototypeBean2 = ac.getBean(PrototypeBean.class);
        System.out.println("prototypeBean1 = " + prototypeBean1);
        System.out.println("prototypeBean2 = " + prototypeBean2);

        Assertions.assertThat(prototypeBean1).isNotSameAs(prototypeBean2);

        ac.close();
    }

    @Scope("prototype")
    static class PrototypeBean {
        @PostConstruct
        public void init() {
            System.out.println("PrototypeBean.init");
        }

        @PreDestroy
        public void destroy() {
            System.out.println("PrototypeBean.destroy");
        }
    }
}
코드를 적은 다음 실행해 봅니다.
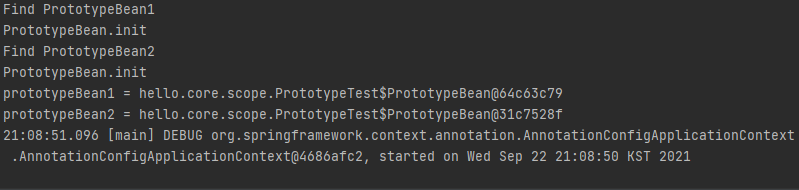
실행결과입니다.
두 개의 빈을 만들어 비교해본 결과 서로 다른 것이 생성된 것을 알 수 있습니다.
그래서 Assertions에서 isNotSameAs를 적용했을 때 정상적인 결과가 나오는 것을 알 수 있죠.
그리고 ac.close(); 를 진행했는데 빈이 Destroy 되었다는 메시지가 나타나지 않는 것을 알 수 있습니다.
이것으로 프로토타입 빈은 생성 후 전혀 관리되지 않는다는 것을 알 수 있습니다.
그래서 @PreDestroy 가 실행되지 않습니다.
@PreDestroy가 실행되려면 클라이언트 측에서 실행을 해야합니다.
여기서는 코드를 이렇게 추가하면 됩니다.
public class PrototypeTest {

    @Test
    void prototypeBeanFind() {
        AnnotationConfigApplicationContext ac = new AnnotationConfigApplicationContext(PrototypeBean.class);

        System.out.println("Find PrototypeBean1");
        PrototypeBean prototypeBean1 = ac.getBean(PrototypeBean.class);
        System.out.println("Find PrototypeBean2");
        PrototypeBean prototypeBean2 = ac.getBean(PrototypeBean.class);
        System.out.println("prototypeBean1 = " + prototypeBean1);
        System.out.println("prototypeBean2 = " + prototypeBean2);

        Assertions.assertThat(prototypeBean1).isNotSameAs(prototypeBean2);

        prototypeBean1.destroy();
        prototypeBean2.destroy();
        ac.close();
    }

    @Scope("prototype")
    static class PrototypeBean {
        @PostConstruct
        public void init() {
            System.out.println("PrototypeBean.init");
        }

        @PreDestroy
        public void destroy() {
            System.out.println("PrototypeBean.destroy");
        }
    }
}
각 빈마다 destroy() 메서드를 호출하면 됩니다.
실제 업무에서는 이런 것은 클라이언트 측에서 직접 종료시켜 줘야 한다는 뜻입니다.
프로토타입 빈에 대해서 정리해보겠습니다.
- 스프링 컨테이너에 요청할 때마다 새로운 빈 생성
- 스프링 컨테이너는 프로토타입 빈의 생성, 의존관계 주입, 초기화에만 관여한다. 그 후는 클라이언트가 관리
- 종료 메서드가 호출X → 프로토타입 빈을 조회한 클라이언트가 직접 종료해야 함
프로토타입 빈은 이런 특징이 있다는 것을 알 수 있었습니다.
다음 포스트에는 싱글톤과 프로토타입을 함께 쓰는 경우 생기는 문제에 대해 알아보겠습니다.
출처: 인프런 - 스프링 핵심원리(기본편) by 김영한
'Spring' 카테고리의 다른 글
| 스프링 코어(17) - 프로토타입과 싱글톤을 같이 쓸 때 해결법 (0) | 2021.11.18 |
|---|---|
| 스프링 코어(16) - 프로토타입과 싱글톤을 같이 쓰는 경우 (0) | 2021.10.04 |
| 스프링 코어(14-1) - 빈 생명주기 콜백 - 3가지 방식 (0) | 2021.08.16 |
| 스프링 코어(14) - 빈 생명주기 콜백 (0) | 2021.08.16 |
| 스프링 코어(번외-2) - 스프링 빈의 자동 & 수동 등록 (0) | 2021.08.15 |


